

American Hurling Trailer Build Log (Part 2 of 4)

Part 2 here took longer than I anticipated to get written, but I suppose that's what happens when the gaelic sports season is ramping up! We recently got our 2022 season started in Nashville at the Music City Invitational and then followed it up with our home tournament, the Greenville Invitational.
When we left off last, we'd just gotten this trailer build started with our hurley wall rack pictured here:

You'll notice that we attached this as high up on the wall of the trailer as possible so that we could add more easily accessible storage underneath. We're half winging this at this point, but we knew we wanted some modular hurley "rack" storage that we could easily remove from the trailer to set out in our display and this space seemed like the perfect location to put those.
If you'll remember from Part 1, I can't build much of anything without a 3D model. It seems all I have saved from this model is a photo of a computer screen, but the gist of the floor rack system was this:

We tested a few sizes of racks and decided that after a long day we wouldn't really want to carry more than 20 adult hurls at once and thus the whole system was based on removable racks of this width. The "containment" apparatus (read: 2x4 structure around the racks) is there to keep the bins from sliding around/falling over when the trailer is in motion and the racks are removable to help us set up and break down our store at tournaments. So let's get this build started!

First a rough layout of how this will go together.

Then the same thing partially assembled. We added a 1x4 to the back wall to keep everything flush and square-ish (we've learned that nothing on an enclosed trailer is really square to begin with) without cutting through the bead of caulk or trim board at the bottom of the wall.

A little proof-of-concept sanity check is always a good step during a build.

Starting to look a bit like that SketchUp model!

The last 3 bins for the rack. This entire trailer build is fueled by pocket hole joinery and flush trim router bits. You can see the excess plywood on the base of these racks that still needed to be trimmed down. You can also see the destructive/hole-digging tendencies of a 3 month old Golden Retriever.
We actually ended up building a lot more of these racks than will fit in this 3x3 configuration because we like them so much and they give us a ton of flexibility when loading/unloading the trailer. It's actually on my to do list to make more of them (regular ones for more adult hurls, wider ones for GK hurls, and shorter ones for youth hurls). We can pack the extra racks in the aisle of the trailer when we go to larger events for more storage and we can easily unload and move a large number of hurls with them when the trailer is in storage. No ash is left in the trailer during the summer months so as to keep the moisture content of our stock as perfect as we can.

Love it when a plan comes together!
All in all it's a very simple design and execution, but it has been a game changer in allowing us to get up and running quickly in the morning at tournaments. We have display racks organized for each of our hurleymakers and they're one of the first things we set up when we arrive at an event. It looks something like this:

And the racks that remain in the trailer give us tons of stable, mobile storage available to replenish these display racks from. So with that done and dusted, let's move on to the next build!
We knew from Day 1 that we wanted to have a workbench in this trailer. We often end up with some hurls to repair at tournaments and it's much easier to have a permanent space to work on them than it is to try to set something up on the fly. We also figured it would be nice to have a flat surface to package up orders from, jot down notes on, or (more typically) pile endless amounts of stuff on until we get fed up with it and decide to finally clean everything back off so that we can belay our good intentions and immediately start piling stuff back on it again. The unintentionally disorganized circle of life; Rafiki would be proud of our constant progression towards entropy.
The trailer is a bull nose design, so the logical place for the workbench was this pointed front "corner". It's easily accessible from the side door, has space in front of it to work, and has potential storage areas both above and below.
Rather than try to figure out the angles in SketchUp, this was the first build of this project that we managed to make up as we went. There was a lot of measuring and sneaking up on cuts, but we ended up with this frame:

The back wall mounts are double anchored into 3-4 metal studs each and then we have 6 cross braces connecting the front of the workbench to the wall.

We added two vertical supports to avoid any deflection when we're swinging hammers and that's it for the frame of the bench. Plenty strong for our usage and ready for a benchtop and some accessories!

A useful little contour gauge made sneaking up on cuts just a tiny bit easier.
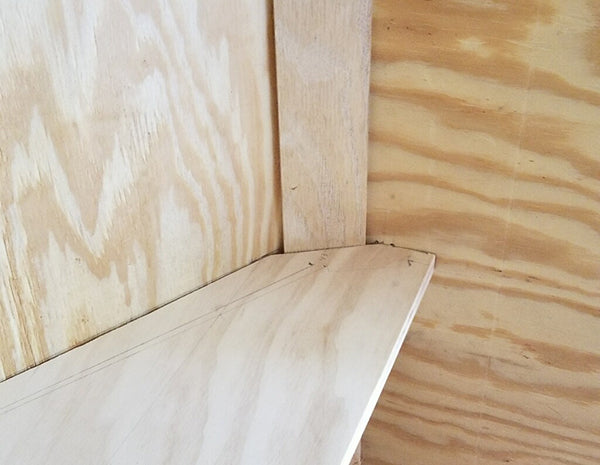
You can see from the pencil line that the angle measuring wasn't working near as well as the contour gauge did. At the end of the day that's a pretty clean fit!

And a blurry finished photo to show this thing off! 3/4" plywood top in place. We've since added some storage (some temporary and some permanent) underneath the bench as well as two shelves above it, but we're still searching for more ideas to make the best use of these spaces. If you have any ideas please let us know!
Let's stop here for Part 2 of this build log. We hope y'all are enjoying this project as much as we are and we can't wait to let you see the end result both via this blog platform and when we cross paths at a tournament!
Leave a comment